
JOURNAL
How to Plan Automation for Any Project — A Practical Framework
A step-by-step framework for planning test automation across web apps, APIs, mobile, and legacy systems. Learn what to automate first, how to estimate ROI, and how to present your automation plan to stakeholders. Part 2 of the QC team's guide to automation with AI.
On this page
Most automation failures don’t start with bad code — they start with bad planning. I’ve watched teams automate the wrong things, pick the wrong tools, and burn out within two months. Not because automation is hard, but because they skipped the planning step entirely.
This is Part 2 of our series. Before you write a single test, you need a strategy. This post gives you a practical framework for planning automation regardless of what kind of project you’re working on.
The Automation Decision Matrix
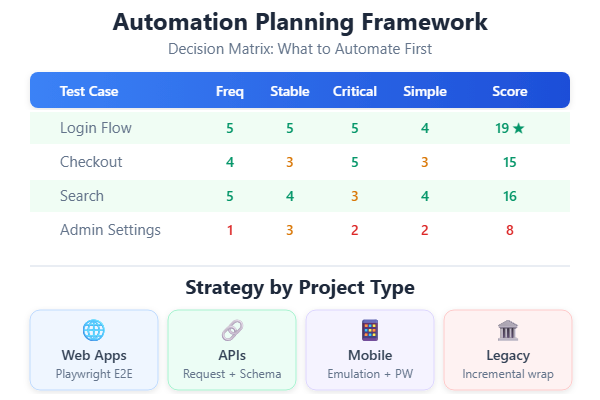
Not everything should be automated. This is the most important lesson I’ve learned: automate strategically, not comprehensively. Use this matrix to decide what goes first:
| Criteria | Score 1 (Low) | Score 5 (High) |
|---|---|---|
| Frequency | Run once a quarter | Run every sprint/day |
| Stability | Feature changes every sprint | Feature is stable for months |
| Criticality | Nice-to-have feature | Revenue-impacting / core flow |
| Complexity | Simple one-step check | Multi-step flow with many states |
| Manual Time | Takes 30 seconds manually | Takes 15+ minutes manually |
Score each test case on these five criteria. Automate the highest-scoring tests first. A test that’s run daily, on a stable feature, for a critical flow, with complex multi-step verification, and takes 15 minutes manually — that’s a score of 25/25. Automate it today.
What to Automate vs. Keep Manual
Always automate:
- Login and authentication flows
- Core business transactions (checkout, orders, payments)
- Data validation and form submissions
- API health checks and contract tests
- Smoke tests for critical pages
- Regression tests for stable features
Keep manual (for now):
- Brand new features still in active development
- One-time data migration verification
- Complex visual design reviews
- Usability and accessibility assessments
- Exploratory testing of edge cases
- Tests requiring physical device interaction
Consider carefully:
- Features that change frequently (high maintenance cost)
- Tests requiring complex test data setup
- Integration with third-party systems you don’t control
- Tests that need human judgment (“Does this look right?”)
Planning for Different Project Types
Every project type has different automation priorities. Here’s how to approach each:
Web Applications (SPA / SSR / Static Sites)
Web apps are the sweet spot for Playwright. You get the most value fastest.
Priority order:
- Smoke tests — Does the app load? Can users navigate? Do critical pages render?
- Authentication flows — Login, logout, session handling, password reset
- Core business flows — The 3-5 most important user journeys (e.g., search → view → add to cart → checkout)
- Form validation — Submit with valid data, invalid data, empty fields, special characters
- Responsive testing — Same tests on mobile viewport and desktop
- Visual regression — Screenshot comparison for key pages
Example test roadmap for an e-commerce web app:
Week 1: Homepage loads, product listing renders, search works
Week 2: Login, registration, password reset
Week 3: Product detail → add to cart → checkout → confirmation
Week 4: Filters, sorting, pagination, empty states
Week 5: Mobile viewport tests for weeks 1-4
Week 6: Visual regression baselines, error state tests
Tools: Playwright (primary), Playwright MCP with Claude (test generation)
API / Microservices
API testing is faster to automate than UI testing because there’s no browser overhead. If your project is primarily API-based, start here.
Priority order:
- Contract tests — Does each endpoint return the expected shape?
- Status code verification — 200 for valid requests, 400 for bad input, 401 for unauthorized
- Data validation — Response fields match expected types, required fields present
- Error handling — Invalid payloads, missing fields, boundary values
- Integration tests — Multiple endpoints called in sequence (real user flow)
- Performance baselines — Response time under load
Example test structure:
test.describe('Products API', () => {
  test('GET /api/products returns product list', async ({ request }) => {
    const response = await request.get('/api/products');
    expect(response.ok()).toBeTruthy();

    const data = await response.json();
    expect(data.products).toBeInstanceOf(Array);
    expect(data.products.length).toBeGreaterThan(0);
    expect(data.products[0]).toHaveProperty('id');
    expect(data.products[0]).toHaveProperty('name');
    expect(data.products[0]).toHaveProperty('price');
  });

  test('GET /api/products/:id returns single product', async ({ request }) => {
    const response = await request.get('/api/products/1');
    expect(response.ok()).toBeTruthy();

    const product = await response.json();
    expect(product.id).toBe(1);
    expect(product.name).toBeTruthy();
  });

  test('POST /api/products rejects invalid data', async ({ request }) => {
    const response = await request.post('/api/products', {
      data: { name: '' }, // Missing required fields
    });
    expect(response.status()).toBe(400);
  });
});
Tools: Playwright request fixture (no browser needed), Postman for exploration
Mobile Applications
Mobile testing is more complex due to device fragmentation. For QC teams starting out, I recommend a pragmatic approach.
Strategy:
- Test the mobile web version first — Use Playwright’s device emulation
- API tests cover the backend — Same as the API section above
- Native mobile testing later — Appium or Detox when the team is more experienced
Playwright device emulation gives you a lot for free:
import { devices } from '@playwright/test';

// In playwright.config.ts
projects: [
  {
    name: 'Mobile Chrome',
    use: { ...devices['Pixel 7'] },
  },
  {
    name: 'Mobile Safari',
    use: { ...devices['iPhone 15'] },
  },
],
This runs your existing tests on mobile viewports. You’ll catch responsive layout issues, touch target size problems, and mobile-specific bugs without any native mobile tooling.
Legacy Systems
Legacy systems are the trickiest because the UI is often inconsistent, there’s no test environment, and the code has zero tests.
Approach:
- Characterization tests first — Tests that document current behavior, not expected behavior
- Record and replay — Use Playwright’s code generation to record manual flows
- Focus on regression — If you can’t add features easily, at least prevent regressions
- API-level tests if possible — Bypass the ugly UI and test the backend directly
Playwright Codegen is perfect for legacy systems:
npx playwright codegen http://your-legacy-app.com
This opens a browser and records every action you take, generating Playwright test code automatically. Even if the generated code needs cleanup, it’s a fast way to document existing flows.
Creating Your Automation Roadmap
Here’s a template for presenting your automation plan to your team and stakeholders:
Phase 1: Foundation (Weeks 1-2)
Goal: Prove that automation works and delivers value.
| Task | Owner | Time |
|---|---|---|
| Set up Playwright project | QC team | 2 hours |
| Write 5 smoke tests for critical paths | QC team | 3 days |
| Set up CI pipeline (GitHub Actions) | QC + Dev | 1 day |
| Demo automated tests to stakeholders | QC team | 1 hour |
Success metric: 5 automated smoke tests run on every PR.
Phase 2: Coverage (Weeks 3-6)
Goal: Cover the top 20 most-tested regression scenarios.
| Task | Owner | Time |
|---|---|---|
| Create Page Object classes for key pages | QC team | 1 week |
| Automate top 20 regression test cases | QC team | 2 weeks |
| Add API endpoint tests | QC + Dev | 1 week |
| Set up test reporting (HTML reports) | QC team | 2 hours |
Success metric: 25+ tests, 80%+ pass rate in CI, regression testing time reduced by 50%.
Phase 3: AI-Assisted Expansion (Weeks 7-10)
Goal: Use AI tools to triple test coverage.
| Task | Owner | Time |
|---|---|---|
| Set up Claude/Copilot for test generation | QC team | 1 day |
| Generate tests for remaining user flows | QC team + AI | 2 weeks |
| Add visual regression tests | QC team | 3 days |
| BDD feature files for critical flows | QC + PO | 1 week |
Success metric: 60+ tests, AI generating first drafts of most tests, visual regression catching CSS issues.
Phase 4: Maturity (Weeks 11-14)
Goal: Self-sustaining automation practice.
| Task | Owner | Time |
|---|---|---|
| Cross-browser testing (Chrome, Firefox, Safari) | QC team | 3 days |
| Performance testing baselines | QC + Dev | 1 week |
| Team training on test maintenance | QC team | 2 sessions |
| Establish Definition of Done with automation | QC + Dev + PO | 1 meeting |
Success metric: Every new feature includes automated tests. Manual regression is a 30-minute review, not a 4-hour grind.
Estimating Automation ROI
Stakeholders want numbers. Here’s how to calculate them:
Time Savings
Manual regression time per release:     4 hours
Number of releases per month:           4
Total manual testing per month:         16 hours

After automation:
Automated test run time:                15 minutes
Manual exploratory time per release:    1 hour
Total testing time per month:           5 hours

Time saved per month:                   11 hours
Time saved per year:                    132 hours
Cost Savings
QC team hourly cost (blended):          $40/hour
Annual time saved:                      132 hours
Annual cost savings:                    $5,280

One-time setup cost:                    ~80 hours × $40 = $3,200
Ongoing maintenance per month:          ~5 hours × $40 = $200

Break-even point:                       ~4 months
Quality Improvement (harder to quantify but real)
- Faster feedback — Bugs caught in minutes, not days
- Consistency — Every test runs the same way every time
- Confidence — Release with evidence, not hope
- Coverage — Tests run 24/7, not just during business hours
- Regression prevention — Automated tests don’t forget to check yesterday’s fix
Choosing the Right Tools
For QC teams starting automation in 2026, here’s my recommendation:
| Need | Tool | Why |
|---|---|---|
| UI Testing | Playwright | Best locators, auto-waiting, great debugging, Microsoft-backed |
| API Testing | Playwright request fixture |
Same tool, no context-switching, built-in assertions |
| BDD | Cucumber + Playwright | Gherkin syntax lets QC write scenarios in English |
| AI Test Generation | Claude Code + Playwright MCP | AI explores the live app and writes tests from accessibility tree |
| AI Code Completion | GitHub Copilot | Inline suggestions as you type test code |
| AI Agentic Work | Antigravity | Autonomous test generation and debugging |
| CI/CD | GitHub Actions | Free for public repos, integrates with everything |
| Reporting | Playwright HTML Reporter | Built in, no extra setup |
| Visual Regression | Playwright toHaveScreenshot() |
Built in, no external service needed |
Why Playwright over Selenium, Cypress, or TestCafe?
- Auto-waiting — No more
sleep(3000)to wait for elements. Playwright waits automatically. - Multiple browsers — Chrome, Firefox, Safari from one script
- Device emulation — Mobile testing without physical devices
- Network interception — Mock APIs without backend changes
- Trace viewer — Time-travel debugging for CI failures
- MCP integration — AI can control a real browser and generate tests
Common Planning Mistakes
Mistake 1: Automating Everything at Once
Symptom: The team tries to automate 200 test cases in month one. Result: Burnout, flaky tests, abandoned project. Fix: Start with 5-10 high-value tests. Get them green and stable. Then expand.
Mistake 2: Automating Unstable Features
Symptom: Tests break every sprint because the feature keeps changing. Result: More time maintaining tests than running them. Fix: Only automate features that are stable. Use manual testing for features in active development.
Mistake 3: No Maintenance Plan
Symptom: Tests are written but nobody updates them when the app changes. Result: Suite becomes unreliable, team loses trust, tests get disabled. Fix: Budget 20-30% of automation time for maintenance. Include test failures in your sprint board.
Mistake 4: Not Involving Developers
Symptom: QC team writes tests in isolation. Dev team doesn’t know or care.
Result: No data-testid attributes, no API stubs, no test environment support.
Fix: Include developers from day one. They add data-testid attributes. You write the tests. Everyone reviews.
Mistake 5: Picking the Wrong Metric
Symptom: Team celebrates “200 automated tests!” but all 200 test the same page. Result: False confidence. Critical paths are untested. Fix: Track scenario coverage, not test count. Cover the most important user journeys first.
Your Automation Planning Template
Here’s a one-page template you can fill out for your project:
# Automation Plan: [Project Name]

## Scope
- Application type: [Web / API / Mobile / Legacy]
- Current test approach: [Manual checklist / Ad-hoc / None]
- Releases per month: [Number]
- Manual regression time: [Hours per release]

## Priority Tests (Top 10)
1. [Test scenario] — Score: [X/25]
2. [Test scenario] — Score: [X/25]
...

## Timeline
- Phase 1 (Weeks 1-2): Foundation — [X] smoke tests
- Phase 2 (Weeks 3-6): Coverage — [X] regression tests
- Phase 3 (Weeks 7-10): AI-Assisted Expansion
- Phase 4 (Weeks 11-14): Maturity

## Tools
- Testing: Playwright
- AI: Claude / Copilot / Antigravity
- CI/CD: GitHub Actions
- BDD: Cucumber (if applicable)

## Expected ROI
- Monthly time saved: [X] hours
- Break-even: [X] months
- Quality improvement: [Qualitative description]

## Team
- QC owner: [Name]
- Dev support: [Name]
- Stakeholder: [Name]
Series Navigation
- Part 1: From Manual Tester to Automation Engineer — The Mindset Shift
- Part 2: How to Plan Automation for Any Project — A Practical Framework (you are here)
- Part 3: Your First Playwright Test — A Step-by-Step Guide for Manual Testers
- Part 4: Page Objects, Fixtures, and Real-World Playwright Patterns
- Part 5: BDD with Cucumber and Playwright — Writing Tests in Plain English
- Part 6: Using AI to Write Tests — Claude, GitHub Copilot, and Antigravity
- Part 7: The QC Tester’s Prompt Engineering Playbook
- Part 8: Sharing the Work — How Dev and QC Teams Collaborate on Test Automation
- Part 9: Measuring and Improving Quality — Metrics That Actually Matter
- Part 10: The Complete Best Practices Checklist for Automation, AI, and Quality
In Part 3, I’ll take you through your very first Playwright test — step by step, assuming zero coding experience. You’ll install everything, write a real test, and see it pass. No prior knowledge required.
Related reading

30 Sep 2026 · 4 min read
ai-agents
Cloudflare Threw an LLM at Its Own WAF — the Real Lesson Isn't the 49 Bugs It Found
1,107 attack attempts, 49 findings, 3 new detection rules. But the number that should change how you test security is the one Cloudflare almost buried: category diversity beat attempt count, every time.
Read more
13 Sep 2026 · 5 min read
agentic coding
Claude Code Ships Plugin Evals: Now You Can Prove a Skill Actually Does Something
Claude Code v2.1.269 adds claude plugin eval — six grader types, a no-plugin baseline, and CI flags like --threshold and --max-cost-usd. A Tech Lead's walkthrough of what it fixes and how to wire it into a release gate.
Read more
04 Sep 2026 · 5 min read
agents
GPT-6 Astra and the Computer-Use Agent: What Changes When There's No API to Call
OpenAI's GPT-6 Astra ships with a 1M-token context window and browser/computer control that works by reading pixels, not APIs. A Tech Lead's take on what this actually unlocks, where it breaks, and how to design review gates before you let it touch production systems.
Read more
Discussion
Comments are reviewed before publication. Your email is kept private.