
JOURNAL
AI-Powered Migration Playbook: WPF to Web with React/Next.js — Choosing Your Path with AI (Part 4 of 7)
Part 4 of 7 — How to migrate a WPF desktop application to a web app using React and Next.js, with AI accelerating the hardest parts. MVVM to component state, XAML to JSX, and the strangler fig pattern.
On this page
Minh’s project started differently from mine. I had a .NET Framework application that needed to run on modern infrastructure. He had a WPF desktop application that needed to become a website.
Same AI tools, same small team, fundamentally different problem.
Desktop-to-web doesn’t feel like a migration. It feels like a rewrite with the original source code as reference material. The UI is entirely incompatible. The desktop UI paradigm (rich client, local state, Windows controls) is foreign to the web paradigm (HTTP stateless, browser API, component lifecycle). And yet — with AI as the bridge — Minh’s team moved faster than anyone expected.
This post covers the WPF → React/Next.js migration. What AI can translate. What it cannot. And the architecture decisions that made the difference between a messy port and a clean modern web application.
The First Decision: Don’t Start with UI
Every instinct says to start with the UI. The user sees the UI. The boss demos the UI. The client approves the UI.
Don’t start with UI.
WPF UI code is deeply coupled to Windows, to XAML, to MVVM patterns that have no direct equivalent in the web world. If you start by trying to convert XAML to JSX, you’ll spend all your time fighting the wrong battle, and you’ll port the architecture problems that made the WPF app hard to maintain into your new web app.
Start with the business logic. Here’s why: the business logic in a WPF application is usually the most valuable thing in the codebase. If you’re building an order management system, the rules for calculating order totals, applying discounts, managing inventory, and generating reports — that’s the asset. The WPF UI is just the delivery mechanism. And delivery mechanisms can be replaced.
The extraction sequence:
- Map your layers: Where is pure business logic? Where does it bleed into UI? Where is data access?
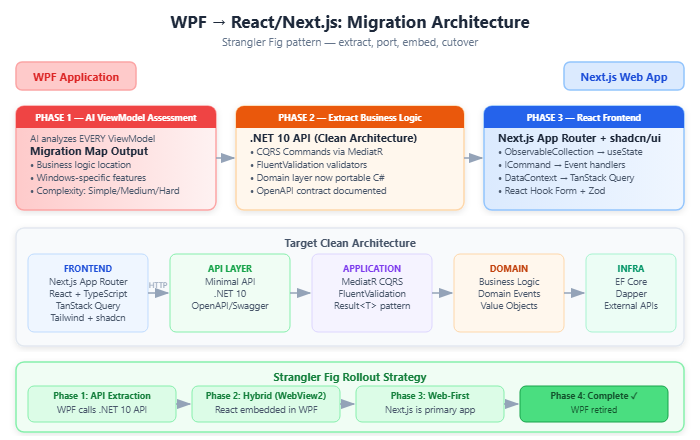
- Extract business logic into a .NET API: Build a modern ASP.NET Core API (.NET 10) that exposes the business logic via HTTP endpoints
- Extract data access: Move to an ORM (EF Core or Dapper) if you were using raw ADO.NET
- Then, and only then, build the React frontend: Consuming the API you just built
This approach means your WPF app and your new web app can run simultaneously during migration. The WPF app can even be updated to consume the new API (using WebView2 or HTTP calls) while the React frontend is being built.
Assessing the WPF Codebase with AI
Before Minh wrote a single line of React, he spent two weeks on assessment. Here’s the AI-assisted process:
Prompt for WPF architecture analysis:
I'm analyzing a WPF application before migrating it to a web application
(React + Next.js + .NET 10 API backend).

Here is a ViewModel or code-behind file:
[paste file]

Please analyze and tell me:
1. What does this screen/feature DO in business terms?
2. What business logic is embedded here that should be in an API?
3. What data does this screen read from / write to?
4. What Windows-specific features does it use? (File dialogs, clipboard,
   hardware, notifications, registry, etc.)
5. What MVVM patterns are used and what's the React equivalent?
6. Migration complexity: Simple (pure UI mapping) / Medium (logic extraction
   needed) / Hard (Windows-specific features with no web equivalent)
Minh ran this analysis on every ViewModel in the application over two days. The output was a migration map:
| Screen | Business Logic | Windows-Specific | Web Equivalent | Complexity |
|---|---|---|---|---|
| OrderEntry | High (validation) | File drag-and-drop | File upload API | Medium |
| Reports | Low (display only) | Crystal Reports | PDF generation API | Simple |
| PrintQueue | None | Windows print spooler | Browser print API | Hard |
| Dashboard | None (display) | None | Direct port | Simple |
| Settings | Low (save prefs) | Registry | API + localStorage | Simple |
The PrintQueue screen was the red flag. It communicated directly with the Windows print spooler — something a web browser fundamentally cannot do. This was flagged as “redesign required,” not “migration required.” The web version would use browser print API (window.print()) for simple cases and a backend PDF service for complex reports.
Finding this early saved weeks of wasted effort trying to “migrate” something that was architecturally unmigrate-able.
Extracting Business Logic to a .NET 10 API
The backend extraction is, frankly, similar to the .NET Framework migration covered in Part 3. The difference: you’re not trying to preserve the WPF interaction model. You’re building a clean REST API.
The target architecture:
If you have a WPF ViewModel that does this:
// WPF OrderEntryViewModel.cs
public class OrderEntryViewModel : ViewModelBase
{
    private readonly IOrderRepository _repo;

    public async Task SaveOrderAsync()
    {
        // Business logic mixed with UI concerns
        if (string.IsNullOrEmpty(CustomerName))
        {
            ErrorMessage = "Customer name is required"; // UI concern
            return;
        }

        if (OrderLines.Count == 0)
        {
            ErrorMessage = "Add at least one item"; // UI concern
            return;
        }

        // This is the real business logic:
        var order = Order.Create(
            CustomerName,
            OrderLines.Select(l => new OrderLine(l.ProductId, l.Quantity, l.Price)).ToList()
        );

        await _repo.SaveAsync(order);
        NavigateTo(nameof(OrderConfirmationView)); // UI concern
    }
}
The extracted API endpoint looks like this:
// .NET 10 Minimal API
app.MapPost("/api/orders", async (
    CreateOrderRequest request,
    ISender sender,
    CancellationToken ct) =>
{
    var result = await sender.Send(new CreateOrderCommand(
        request.CustomerName,
        request.Lines.Select(l => new OrderLineDto(l.ProductId, l.Quantity, l.Price)).ToList()
    ), ct);

    return result.IsSuccess
        ? Results.Created($"/api/orders/{result.Value.OrderId}", result.Value)
        : Results.ValidationProblem(result.Errors.ToDictionary());
})
.WithName("CreateOrder")
.Produces<OrderCreatedResponse>(201)
.ProducesValidationProblem();
The validation business rules go in a FluentValidation validator, not in the endpoint. The UI concerns (error messages, navigation) go in the React frontend. The business logic is now in the Application layer command handler.
AI prompt for ViewModel extraction:
I'm extracting business logic from this WPF ViewModel to a .NET 10 API
using Clean Architecture with CQRS (MediatR + FluentValidation).

Architecture:
- Command/Query via MediatR
- Validation via FluentValidation
- Return type: Result<T> (not throwing exceptions)
- Target framework: .NET 10 Minimal API

Here is the ViewModel:
[paste ViewModel]

Please:
1. Identify the pure business logic (separate from UI and navigation)
2. Create the CreateXCommand, handler, and FluentValidation validator
3. Create the Minimal API endpoint that uses this command
4. Identify what goes in React (error display, navigation, form state)
5. Flag anything that's a Windows-specific concern needing special handling
The React/Next.js Frontend
Once the API is built and tested, the React frontend is much more straightforward. You’re building a new web application against a clean API, not trying to translate XAML pixel-by-pixel.
Technology choices we made:
- Next.js App Router — for server-side rendering, API routes, and file-based routing
- React Hook Form — for form management (replaces WPF data binding)
- Zod — for client-side schema validation (parallel to backend FluentValidation)
- TanStack Query (React Query) — for data fetching and caching (replaces WPF commands + repositories)
- Radix UI / shadcn/ui — for accessible component primitives (replaces WPF controls)
- Tailwind CSS — for styling
The MVVM to React mental model shift:
| WPF Concept | React Equivalent |
|---|---|
ObservableCollection<T> |
useState<T[]>() or TanStack Query data |
INotifyPropertyChanged |
React component state + useState |
RelayCommand / ICommand |
Event handlers + async functions |
Data binding ({Binding}) |
Controlled components + value={state} |
DataContext |
Props + Context API / Zustand |
| ViewModel constructor injection | Custom hooks |
NavigationService |
Next.js router |
| Code-behind event handlers | Component event props |
AI prompt for MVVM → React conversion:
I'm converting a WPF ViewModel + View pair to a React component for
Next.js App Router.

The app uses: React Hook Form, Zod for validation, TanStack Query for
data fetching, Tailwind CSS for styling, and calls a .NET 10 REST API.

Here is the WPF ViewModel:
[paste ViewModel]

Here is the XAML View:
[paste XAML]

Here is the API contract (endpoint + request/response DTOs):
[paste API definition]

Please create:
1. A React component (.tsx) for this screen
2. A custom hook that handles data fetching via TanStack Query
3. A Zod schema matching the form validation
4. Use React Hook Form for form state management
5. Handle loading, error, and success states

Style with Tailwind. Don't create custom CSS.
Keep business logic in the API — this component only handles UI concerns.
The output quality from AI here is noticeably better than legacy .NET migration, because React/Next.js patterns are well-represented in AI training data. The AI knows how to structure a useQuery, how to handle form submission with React Hook Form, and how to map Zod validation to inline errors. The main thing you’re checking in review is whether the API calls are correct and whether the UX matches the expected behavior.
Handling WPF-Specific Features on the Web
File System Access
WPF: OpenFileDialog, direct File.ReadAllBytes()
Web: <input type="file">, File API, upload to API endpoint
// React file upload
const handleFileUpload = async (e: React.ChangeEvent<HTMLInputElement>) => {
  const file = e.target.files?.[0];
  if (!file) return;

  const formData = new FormData();
  formData.append('file', file);

  const response = await fetch('/api/documents/upload', {
    method: 'POST',
    body: formData,
  });
};
Desktop Notifications
WPF: TaskbarItemInfo, System.Windows.Forms.NotifyIcon
Web: Web Notifications API (browser permission required)
const requestNotificationPermission = async () => {
  if (Notification.permission !== 'granted') {
    await Notification.requestPermission();
  }
};

const showNotification = (title: string, body: string) => {
  if (Notification.permission === 'granted') {
    new Notification(title, { body });
  }
};
Keyboard Shortcuts
WPF: InputBindings, KeyBinding
Web: Event listeners, React keyboard hooks
// using react-hotkeys-hook
import { useHotkeys } from 'react-hotkeys-hook';

useHotkeys('ctrl+s', () => handleSave(), { preventDefault: true });
useHotkeys('ctrl+z', () => handleUndo(), { preventDefault: true });
Printing
WPF: Windows print spooler, complex print layouts
Web: Browser print API for simple, PDF generation API for complex
// Simple case: browser print
const handlePrint = () => window.print();

// Complex case: fetch PDF from API
const handlePrintReport = async () => {
  const pdf = await fetch(`/api/reports/${reportId}/pdf`);
  const blob = await pdf.blob();
  const url = URL.createObjectURL(blob);
  window.open(url, '_blank');
};
The Strangler Fig Migration Strategy
Minh’s team didn’t switch off WPF and switch on React simultaneously. They used the Strangler Fig pattern — gradually replacing parts of the WPF application with web equivalents while both systems run in parallel.
Phase structure:
| Phase | What runs | User experience |
|---|---|---|
| 1: API extraction | WPF + .NET API | WPF app, internal refactor only |
| 2: Hybrid | WPF (most screens) + WebView2 (new screens) | Mostly unchanged |
| 3: Web-first | Next.js (main) + WPF (legacy screens still pending) | Web UI for new features |
| 4: Complete | Next.js only | Full web experience |
WebView2 (Microsoft’s embedded Chromium for Windows apps) was the bridge. Minh’s team embedded finished React screens into the WPF shell using WebView2. Users didn’t even notice the transition — they were still clicking within the same application window, but some screens were now React components running in an embedded browser.
// WPF code-behind: embed a web screen
private void ShowOrderEntry_Click(object sender, RoutedEventArgs e)
{
    // Old: navigate to WPF screen
    // NavigateTo(typeof(OrderEntryView));

    // New: open React screen in WebView2
    webView.Source = new Uri("https://app.company.com/orders/new");
}
This approach let the team ship value incrementally, get user feedback on the web interface before the full cutover, and avoid the big-bang risk of switching everything at once.
What We’d Tell Minh to Do Differently
Looking back, three things would have accelerated Minh’s migration:
1. Component library first
Before migrating any screen, build your shared component library: buttons, inputs, modals, tables, forms. Define the design system. Every migrated screen then draws from this library. Without it, Minh’s team built slightly different versions of the same dropdown component on five different screens.
2. API contract documentation from the start
The handoff between the backend (.NET API) and frontend (React) team was smoother when they had explicit API contracts (OpenAPI/Swagger). When the backend changed a response shape, the frontend found out two days later when React broke. Treat the API contract as a living specification that both sides own.
3. E2E tests capture WPF behavior before migration starts
Playwright scripts running against the WPF application (or against well-documented user workflows) gave us a baseline for “does the web version behave the same?” You can’t automate WPF UI testing at scale, but you can document the key user journeys and then automate those same journeys in Playwright against the web app.
This is Part 4 of a 7-part series: The AI-Powered Migration Playbook.
Series outline:
Related reading
10 Sep 2026 · 6 min read
agentic coding
Beyond the Chatbox: Why Your Next Agent Feature Shouldn't Be a Text Stream
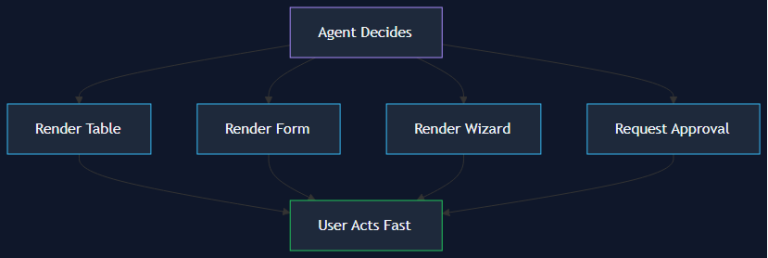
Design agency Wavespace's 'Beyond the Chatbox' framework reframes agent UX around generative UI — tables, forms, and wizards the agent renders on demand instead of a wall of text. A technical lead's breakdown of the pattern, the implementation stack, and a real case study showing 38% faster task completion.
Read more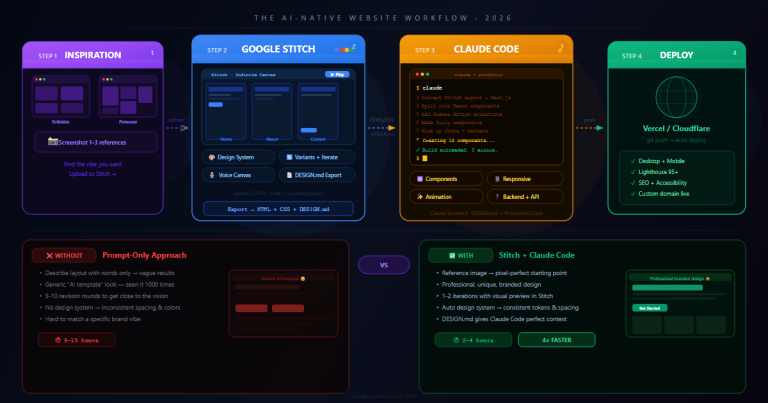
20 Mar 2026 · 8 min read
ai-workflow
Google Stitch + Claude Code: Build Professional Websites in Hours, Not Weeks
A practical guide to combining Google Stitch (free AI design tool) with Claude Code to create branded, production-ready websites — without the generic AI template look.
Read more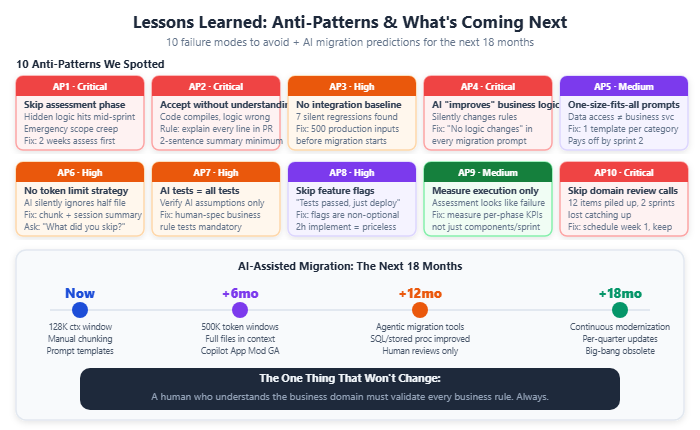
10 Mar 2026 · 10 min read
ai
AI-Powered Migration Playbook: Lessons Learned — What We'd Do Differently (Part 7 of 7)
Part 7 of 7 — The final retrospective. Ten anti-patterns to avoid, what AI genuinely can't do, what surprised us, and where AI-assisted migration is heading next.
Read more
Discussion
Comments are reviewed before publication. Your email is kept private.