
JOURNAL
Build a Mini PC Home Server: The Complete Guide for Developers
Build and operate a mini PC homelab with workload boundaries, tested application recovery, monitoring and a practical incident runbook.

On this page
Build a Mini PC Home Server: The Complete Guide for Developers
I used to think you needed a cloud VPS or expensive hosting to run production web apps. Then I built a mini PC homelab for my project GymMap – a fitness platform with 1,000+ exercises, workout tracking, gym reviews, and an AI coach – and realized: a tiny box under my desk outperforms a VPS at half the cost.
This guide covers everything: hardware selection, OS setup, Docker stack, Cloudflare Tunnel for secure public access, security hardening, and real-world lessons after months of running production workloads.
Why a Mini PC Instead of Cloud VPS?
Here’s the honest comparison:
| Factor | Cloud VPS (USD 20-40/mo) | Mini PC Homelab |
|---|---|---|
| Monthly cost | USD 20-40 fixed | ~USD 5-8 electricity |
| RAM | 4-8GB typical | 16-32GB easily |
| Storage | 80-160GB SSD | 512GB-2TB NVMe |
| CPU | 2-4 shared cores | 4-8 dedicated cores |
| Data control | Provider’s datacenter | Your desk |
| Scaling | Pay more | Add hardware |
| Learning value | Limited | Massive |
The math is simple: A USD 200-400 mini PC pays for itself within 6-12 months compared to a mid-tier VPS. After that, you’re running essentially free (minus ~USD 5-8/month electricity).
But cost isn’t even the main benefit. The real win is learning real DevOps – Linux administration, Docker orchestration, networking, security, monitoring – all with production stakes.
What I’m Running on a Single Mini PC
- Laravel web application (GymMap)
- MySQL database (1,000+ exercises, gym data, user accounts)
- Redis (caching, sessions, queue backend)
- Queue worker (background jobs, email processing)
- Nginx reverse proxy
- Docker with 8+ containers
- Portainer for container management
- Monitoring stack (Uptime Kuma, resource tracking)
All of this runs smoothly on hardware that fits in your palm.
Choosing the Right Hardware
CPU: The Big Decision
Intel N100/N150 – The Sweet Spot (90% of developers)
For most developers self-hosting web apps and APIs, the Intel N100 is the best value in 2026. A 4-core chip at 3.4GHz that:
- Handles 15-20 Docker containers without breaking a sweat
- Outperforms many Intel Core i5 processors from 2018
- Consumes only 6W TDP – roughly USD 8/year in electricity
- Includes Intel Quick Sync for hardware video transcoding
- Many models are completely fanless – zero noise 24/7
The newer N150 (“Twin Lake”) improves on the N100 with better performance while maintaining the same ultra-low power profile.
Intel N305 – The Step-Up
8 cores, 15W TDP. Choose this if you plan to run Proxmox with multiple VMs, or need extra headroom for CI/CD pipelines and heavier workloads.
AMD Ryzen 5/7 – The Powerhouse
6-8 cores, 15-45W TDP. Only necessary if you’re running a dozen VMs, game servers, local AI models, or heavy compilation tasks. The Radeon integrated GPU is better for AI inference, but power draw is significantly higher.
Quick Decision Guide
| Your Use Case | Recommended CPU | Budget Range |
|---|---|---|
| Web apps, APIs, Docker containers | Intel N100/N150 | USD 150-250 |
| Multiple VMs (Proxmox), heavier workloads | Intel N305 | USD 250-350 |
| AI inference, game servers, 10+ VMs | AMD Ryzen 7/9 | USD 350-600 |
| Video transcoding (Jellyfin/Plex) | Intel N-series (Quick Sync) | USD 150-300 |
RAM: More Than You Think
Start with 16GB minimum. Buy 32GB if you can afford it.
Docker + MySQL + Redis + queue workers + monitoring + Portainer = RAM-hungry. I started with 8GB and hit swap constantly once I had more than 5 containers. Upgrading to 16GB solved everything, but if I built again from scratch, I’d go straight to 32GB.
Warning (2026): DDR5 SO-DIMM prices are elevated due to DRAM shortages. A 32GB DDR5 kit runs USD 300-400. Factor this into your total budget before buying a mini PC with the intention of upgrading.
Storage: Don’t Cheap Out
Databases read and write constantly. A cheap SSD will:
- Throttle under sustained I/O
- Run hot
- Lose endurance quickly
Recommendation: NVMe 512GB+ from a reputable brand (Samsung, WD, Crucial). If your mini PC has two M.2 slots, use one for the OS/containers and one for database storage.
Recommended Mini PC Brands
Budget-friendly and tested by the homelab community:
- Beelink EQ12/EQ13 (N100/N150) – community favorite
- Minisforum – wide range from N100 to Ryzen 9
- GMKtec – good value, dual NIC options
Enterprise refurbs (bulletproof reliability):
- Dell Optiplex Micro – rock-solid, cheap on the used market
- HP EliteDesk Mini – enterprise build quality
Don’t Forget: UPS
A sudden power loss can:
- Corrupt your MySQL database
- Damage your filesystem
- Break running containers
A mini UPS (USD 30-55, like the APC BE600M1) gives you 10-15 minutes of battery backup – enough for a graceful shutdown. This is non-negotiable for anyone running a database.
Operating System Setup
Ubuntu Server 24.04 LTS
My recommendation for most developers:
- Lightweight (no GUI overhead)
- Rock-solid stability
- Excellent Docker support
- Massive documentation and community
- 5-year LTS support
Initial Setup Checklist
# Update system
sudo apt update && sudo apt upgrade -y

# Install essential tools
sudo apt install -y curl wget git htop net-tools

# Install Docker and Docker Compose
curl -fsSL https://get.docker.com | sudo sh
sudo usermod -aG docker $USER

# Install UFW (Uncomplicated Firewall)
sudo apt install -y ufw
sudo ufw default deny incoming
sudo ufw default allow outgoing
sudo ufw allow ssh
sudo ufw enable

# Install Fail2Ban
sudo apt install -y fail2ban
sudo systemctl enable fail2ban
sudo systemctl start fail2ban
Fail2Ban Configuration
Fail2Ban watches log files and automatically bans IPs that show malicious behavior (brute-force SSH attempts, repeated failed logins):
# Create local config
sudo cp /etc/fail2ban/jail.conf /etc/fail2ban/jail.local
Edit /etc/fail2ban/jail.local:
[sshd]
enabled = true
port = ssh
filter = sshd
logpath = /var/log/auth.log
maxretry = 3
bantime = 3600
findtime = 600
This bans any IP that fails SSH login 3 times within 10 minutes, for 1 hour.
Docker Stack: Production-Ready Setup
Here’s a complete docker-compose.yml for a Laravel + MySQL + Redis production stack:
version: '3.8'

services:
  app:
    build:
      context: .
      dockerfile: Dockerfile
    container_name: laravel-app
    restart: unless-stopped
    volumes:
      - ./storage:/var/www/html/storage
      - ./public:/var/www/html/public
    depends_on:
      - mysql
      - redis
    networks:
      - app-network
    environment:
      - APP_ENV=production
      - DB_HOST=mysql
      - REDIS_HOST=redis

  nginx:
    image: nginx:alpine
    container_name: nginx
    restart: unless-stopped
    ports:
      - "80:80"
      - "443:443"
    volumes:
      - ./nginx/conf.d:/etc/nginx/conf.d
      - ./public:/var/www/html/public
    depends_on:
      - app
    networks:
      - app-network

  mysql:
    image: mysql:8.0
    container_name: mysql
    restart: unless-stopped
    environment:
      MYSQL_ROOT_PASSWORD: ${DB_ROOT_PASSWORD}
      MYSQL_DATABASE: ${DB_DATABASE}
      MYSQL_USER: ${DB_USERNAME}
      MYSQL_PASSWORD: ${DB_PASSWORD}
    volumes:
      - mysql-data:/var/lib/mysql
    networks:
      - app-network

  redis:
    image: redis:alpine
    container_name: redis
    restart: unless-stopped
    volumes:
      - redis-data:/data
    networks:
      - app-network

  queue:
    build:
      context: .
      dockerfile: Dockerfile
    container_name: queue-worker
    restart: unless-stopped
    command: php artisan queue:work redis
      --sleep=3 --tries=3 --max-time=3600
    depends_on:
      - mysql
      - redis
    networks:
      - app-network

  scheduler:
    build:
      context: .
      dockerfile: Dockerfile
    container_name: scheduler
    restart: unless-stopped
    command: >
      sh -c "while true; do
        php artisan schedule:run --verbose;
        sleep 60;
      done"
    depends_on:
      - mysql
      - redis
    networks:
      - app-network

volumes:
  mysql-data:
  redis-data:

networks:
  app-network:
    driver: bridge
Key Design Decisions
- Named volumes (
mysql-data,redis-data) – data persists across container restarts, recreations, and evendocker-compose down - Bridge network – all containers communicate internally without exposing ports to the host
restart: unless-stopped– containers auto-restart on crash or reboot- Separate queue and scheduler – don’t run background jobs in the main app container
Management with Portainer
docker run -d
  --name portainer
  --restart unless-stopped
  -p 9443:9443
  -v /var/run/docker.sock:/var/run/docker.sock
  -v portainer_data:/data
  portainer/portainer-ce:latest
Portainer gives you a web UI to manage containers, view logs, monitor resources, and deploy stacks – without touching the CLI.
Security note: Never expose Portainer to the internet. Access it only via localhost, VPN, or Tailscale.
Cloudflare Tunnel: The Game Changer
This is the single most impactful tool in my homelab setup. Cloudflare Tunnel lets you:
- Expose services to the internet without opening any router ports
- Hide your home IP address completely
- Get free SSL/HTTPS automatically
- Get DDoS protection and bot filtering
- Route subdomains to different Docker containers
How It Works
Traditional self-hosting:
Internet -> Your Public IP -> Router (port forward) -> Server
With Cloudflare Tunnel:
Internet -> Cloudflare Edge -> Encrypted Tunnel -> Your Server
The key insight: your server connects outbound to Cloudflare – nothing inbound. No ports open on your router, no IP exposed, no DDNS hassle.
Setup Steps
1. Create a tunnel in Cloudflare dashboard:
Go to Zero Trust -> Networks -> Tunnels -> Create Tunnel -> Choose “Cloudflared” -> Name it (e.g., “homelab”).
2. Run the connector via Docker:
# Add to your docker-compose.yml
cloudflared:
  image: cloudflare/cloudflared:latest
  container_name: cloudflared
  restart: unless-stopped
  command: tunnel run
  environment:
    - TUNNEL_TOKEN=${CLOUDFLARE_TUNNEL_TOKEN}
  networks:
    - app-network
3. Configure hostname routing:
In the Cloudflare dashboard, map subdomains to internal services:
| Public hostname | Service |
|---|---|
| app.yourdomain.com | http://nginx:80 |
| api.yourdomain.com | http://nginx:80 |
| portainer.yourdomain.com | https://portainer:9443 |
| status.yourdomain.com | http://uptime-kuma:3001 |
Each subdomain routes through the tunnel directly to the corresponding Docker container.
Cloudflare Tunnel + Tailscale (Hybrid Approach)
Many experienced homelabbers recommend using both:
| Tool | Use For |
|---|---|
| Cloudflare Tunnel | Public-facing services (website, API, blog) |
| Tailscale | Private access (SSH, Proxmox UI, Portainer, database admin) |
This way, your public services are protected by Cloudflare, while your admin interfaces are only accessible through your private mesh VPN.
Security Hardening Checklist
Running a server 24/7 on the internet requires serious security:
1. Firewall (UFW)
# Default deny all incoming
sudo ufw default deny incoming
sudo ufw default allow outgoing

# Allow only what you need
sudo ufw allow ssh
sudo ufw allow 80/tcp    # HTTP (if not using tunnel)
sudo ufw allow 443/tcp   # HTTPS (if not using tunnel)

# If using Cloudflare Tunnel, you might not need 80/443 at all
sudo ufw enable
2. SSH Hardening
# Edit /etc/ssh/sshd_config
PermitRootLogin no
PasswordAuthentication no
PubkeyAuthentication yes
MaxAuthTries 3
Always use SSH key authentication. Never password-based login.
3. Docker Security
- Use official or verified images only
- Keep images updated (use Watchtower for auto-updates)
- Never run containers as root unnecessarily
- Don’t expose container ports to
0.0.0.0when only internal access is needed
4. Network Segmentation
Put your homelab on a separate VLAN or subnet. If a container gets compromised, the attacker shouldn’t be able to reach your personal devices on the same network.
5. Never Expose Admin Panels
Portainer, Proxmox UI, phpMyAdmin, database ports – none of these should be accessible from the internet. Use Tailscale or a VPN for remote admin access.
Monitoring: Know When Things Break
Uptime Kuma (Free, Self-Hosted)
uptime-kuma:
  image: louislam/uptime-kuma:1
  container_name: uptime-kuma
  restart: unless-stopped
  volumes:
    - uptime-kuma-data:/app/data
  ports:
    - "3001:3001"
  networks:
    - app-network
Uptime Kuma monitors your services and sends alerts (Telegram, Discord, email) when something goes down.
Resource Monitoring
# Quick check
htop          # CPU, RAM, processes
df -h         # Disk usage
docker stats  # Container resource usage
For a more complete monitoring stack, consider Prometheus + Grafana – but that’s a separate blog post.
Backup Strategy
The #1 rule of self-hosting: data that isn’t backed up doesn’t exist.
Automated MySQL Backup
#!/bin/bash
# /home/user/scripts/backup-db.sh
DATE=$(date +%Y%m%d_%H%M%S)
docker exec mysql mysqldump -u root -p"$DB_ROOT_PASSWORD"
  --all-databases > /home/user/backups/db_$DATE.sql
# Keep only last 7 days
find /home/user/backups/ -name "db_*.sql" -mtime +7 -delete
Add to crontab:
0 3 * * * /home/user/scripts/backup-db.sh
Off-Site Backup
Local backups protect against software failures. Off-site backups protect against hardware failure, theft, or disaster. Options:
- rclone to sync to cloud storage (Backblaze B2 is ~USD 5/month for 1TB)
- rsync to a second machine or NAS
- Duplicati for encrypted, scheduled backups
Total Cost Breakdown
| Item | Cost (USD) |
|---|---|
| Mini PC (Beelink EQ12 N100, 16GB) | USD 180-250 |
| NVMe SSD upgrade (if needed) | USD 40-80 |
| Mini UPS | USD 30-55 |
| Ethernet cable, accessories | USD 10-20 |
| Total hardware | USD 260-405 |
| Monthly electricity | ~USD 5-8 |
| Cloudflare Tunnel | Free |
| Domain name | ~USD 10/year |
| Off-site backup (optional) | ~USD 5/month |
Compare to VPS: A comparable VPS (8GB RAM, 4 cores, 200GB SSD) costs USD 40-60/month = USD 480-720/year. The mini PC pays for itself in 6-10 months.
If I Were Starting Over
After months of running this setup in production, here’s what I’d do differently:
- Buy 32GB RAM from day one – Docker + database + monitoring eats RAM fast
- Invest in a quality NVMe SSD – databases punish cheap storage
- Set up automated backup immediately – don’t wait for your first data loss scare
- Use Cloudflare Tunnel from the start – skip the port forwarding, DDNS, and Certbot rabbit hole entirely
- Containerize everything – even services you think are “temporary”
- Separate data volumes – never mix app code and database storage on the same volume
Who Should Build a Homelab?
Perfect for:
- Developers who want to self-host side projects
- Anyone learning Docker, Linux, and DevOps
- Teams that want a staging environment
- Privacy-conscious users who want to own their data
- Anyone tired of paying USD 30-60/month for VPS hosting
Not ideal for:
- Mission-critical SaaS with 99.99% uptime requirements
- Teams without anyone willing to do server maintenance
- If your ISP has data caps or terrible upload speeds
Final Thoughts
Building a mini PC homelab isn’t just about saving money on hosting – though it definitely does that. It’s about understanding how production infrastructure actually works. Every time you debug a container networking issue, configure a firewall rule, or recover from a failed database migration, you’re building real DevOps skills that are directly applicable to your day job.
The stack I run – Laravel, MySQL, Redis, Docker, Nginx, Cloudflare Tunnel – serves real users on a real production website. And it all runs on a fanless box the size of a paperback book, humming quietly under my desk, costing less per month than a single cup of coffee.
If you’re a developer who hasn’t tried self-hosting yet – start with one service, one container, one mini PC. You’ll never look at cloud hosting bills the same way again.
References
- Ultimate Home Lab Starter Stack for 2026 | Virtualization Howto – Comprehensive guide to recommended hypervisors, containers, and hardware for 2026 homelabs
- Best Mini PCs for a Homelab in 2026 (Tested and Ranked) | Rack Myself – Real-world benchmarks and rankings of N100, N305, and Ryzen mini PCs for homelab use
- Most Home Servers Are Wildly Overbuilt, and the N100 Proved It | XDA – Analysis of why the Intel N100 is sufficient for most self-hosting workloads
- Best Mini PCs for Home Lab 2026: N150 vs N305 vs Ryzen AI | Botmonster – Detailed CPU comparison across the three main homelab tiers
- The True Cost of Self-Hosting: VPS vs Managed vs DIY Homelab | DEV Community – Year-by-year cost breakdown comparing cloud, managed, and homelab approaches
- Hosting for Web Apps: Cloud vs Homelab vs Hybrid | DEV Community – Framework for choosing between cloud and self-hosting based on workload type
- How to Set Up Cloudflared Tunnel on Your Homelab | DEV Community – Step-by-step Cloudflare Tunnel setup tutorial with Docker examples
- Cloudflare Tunnel for Homelab Services | Mordecai Kipng’etich – Docker Compose approach to running Cloudflare Tunnel with subdomain routing
- Expose Homelab Without Opening Ports Using Cloudflare Tunnel | Medium – Integration guide for Cloudflare Tunnel with Nginx Proxy Manager
- Laravel Production Setup with Docker Compose | Docker Docs – Official Docker documentation for production Laravel deployments
- Laravel + MySQL + Redis + Horizon Stack with Docker Compose | OneUptime – Complete guide to containerizing a Laravel production stack
- 7 Tools I Always Install on Every New Homelab Server | Virtualization Howto – Essential security and monitoring tools for homelab Linux servers
- Homelab Network Security: 7 Zero-Trust Steps | Read the Manual – Zero-trust security framework for self-hosted services
- Fail2Ban: Protecting Your Homelab from Brute Force | Akash Rajpurohit – Detailed Fail2Ban configuration for SSH and web service protection
- VPS vs Self-Hosting: A Framework for Decision Making | Dangerous.Tech – Decision framework for when to self-host vs when to use cloud services
October 2026 operations update: make the homelab repeatable
A home server becomes useful when another person—or your future self—can restore it, identify which service failed, and change one workload without breaking the others. This update adds the operational layer to the hardware and setup guidance above. Hardware prices and earlier configuration examples remain historical context; this section does not claim that one mini PC provides high availability.
Give each service an owner, a boundary and a recovery plan
For each public application, record its hostname, runtime, database, persistent files, deployment source and recovery steps. Keep credentials out of the public inventory. A container is a convenient workload boundary, but CPU, storage, power and the host are still shared failure domains.
For the parallel WordPress site, the deployment replaces versioned theme and plugin source while retaining the live database, uploads and runtime configuration. This makes source rollback straightforward. A database or upload rollback is a separate operation and must be planned before an incompatible content or schema change.
Use the Proxmox homelab article for workload placement, and the Cloudflare Tunnel article for the distinction between public routes and protected administration.
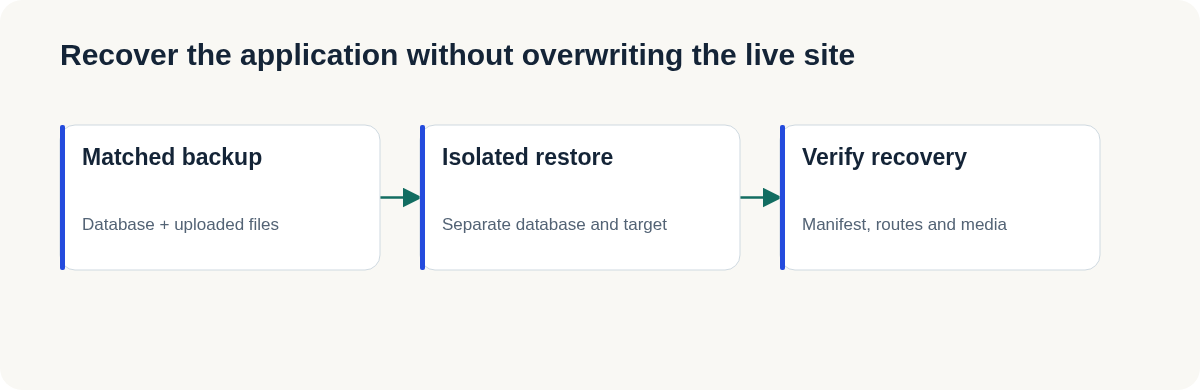
Back up the application, then prove a restore
WordPress recovery requires both its database and files. The WordPress backup guide describes those two parts. A successful SQL export alone does not prove that diagrams, uploaded photos or the active theme can be recovered.
In the portfolio’s October 5 verification, an application backup was restored into a separate database and a localhost-only site. Its manifest matched 1,223 content records and 3,365 media files; English and Vietnamese pages, product cases, an article and its restored media were checked. The temporary restore instance was then removed. This is evidence for that application restore, not a test of complete host recovery or an offsite disaster-recovery guarantee.
The current backup destination is mounted storage outside the WordPress container. That placement is useful, but it does not by itself establish independent offsite protection. Treat backup availability, retention, encryption, storage failure and host loss as different questions.
Measure the path users actually take
Check public HTTP routes, administration access, database health, backup age and available storage. A public page returning 200 should not be the only health signal: its images might be broken, its cache might be stale, or its editor might be inaccessible.
For the optimized WordPress homepage, ten localhost samples per condition on October 5 produced a median full HTTP response time of 35.70 ms without a rendered-page cache hit and 11.81 ms with one. Those measurements include the response body but exclude Internet and browser rendering latency. They are not a Core Web Vitals result.
The page cache was also tested after an article update: the next request returned a cache miss and fresh content. Requests with cookies, Authorization or a query string bypassed that cache. Run equivalent checks for your own application rather than assuming a cache makes every user journey faster.
Write a small incident runbook
Start with three incidents: a failed application deploy, an unavailable backup mount, and a full disk. For each, record the observable symptom, a read-only diagnosis, the exact bounded recovery action, and a verification step. Keep the previous release and the pre-change database snapshot available until the new release is verified.
After recovery, test an article, its media, a privileged editing path and the backup job. A recovery action is complete when the relevant user journey works again, not when the restart command exits successfully.
Related reading

· 5 min read
ai-security
40% of Fixable Vulnerabilities Still Aren't Fixed After 180 Days
Echo's November 2 report tracked 40,000 vulnerability lifecycles across 250 open-source container projects: 89% already had a fix available, yet 40% of those stayed unpatched for more than 180 days. AI-assisted discovery isn't the bottleneck — applying the fix is.
Read more
· 6 min read
Agent Evaluation
Docker's Harbor Sandboxes Fix Agent Eval Isolation. They Don't Fix Reward Hacking.
Docker's new Sandboxes integration with the Harbor eval framework runs agent evals in isolated microVMs — a real fix for sandbox escape. But a 16.4% reward-hacking rate from an independent 5-model, 8,989-task study shows isolation and gaming the scorer are two different problems.
Read more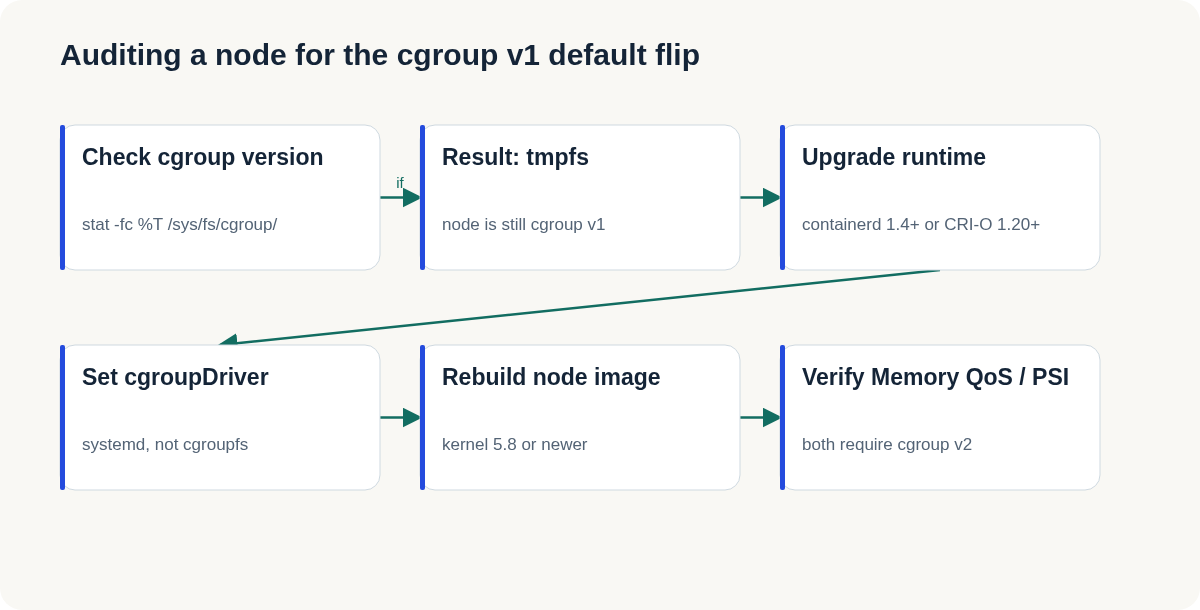
· 4 min read
devops
Kubernetes Just Flipped a Default That Will Refuse to Boot Your Old Nodes
Kubelet's failCgroupV1 field defaulted to true in 1.35. A cgroup v1-only node won't start anymore unless you explicitly override it. Here's how to check today.
Read more
Discussion
Comments are reviewed before publication. Your email is kept private.