
JOURNAL
Building a Self-Hosted Homelab with Proxmox: Website, NAS, Dev Server — All on One Machine
Separate guest and application recovery in a Proxmox homelab, with consistent backups, isolated restore tests and clear failure scenarios.
On this page
I spent years paying for VPS hosting, cloud storage, and remote dev environments. Monthly costs kept creeping up — $5 here for a Linode, $10 there for a NAS subscription, another $20 for a beefier dev server. One day I looked at my old desktop gathering dust and thought: what if one machine could do everything?
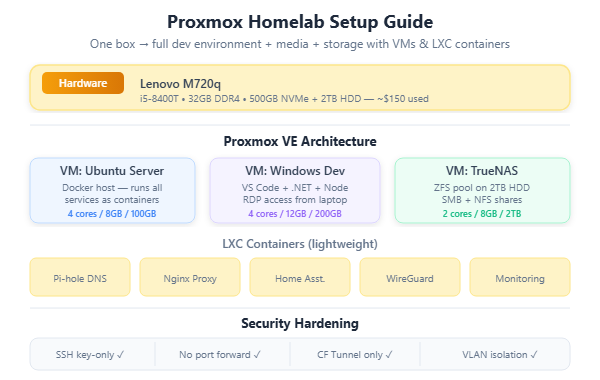
That machine now runs Proxmox VE and hosts my website, a NAS for family storage, an Ubuntu server for web applications, and a Windows 10 VM for .NET development. Total monthly cost after the initial hardware: electricity. Here’s how I set it all up, and why it might (or might not) make sense for you.
What Is Proxmox VE?
Proxmox Virtual Environment is a free, open-source Type 1 hypervisor — meaning it runs directly on hardware, not on top of another operating system like Windows or macOS. Think of it as the foundation that lets you run multiple virtual machines (VMs) and containers on a single physical computer.
┌──────────────────────────────────────────────────────┐
│                  Physical Hardware                     │
│          (CPU, RAM, Storage, Network)                 │
├──────────────────────────────────────────────────────┤
│                   Proxmox VE                          │
│              (Type 1 Hypervisor)                      │
├────────────┬────────────┬─────────────┬──────────────┤
│  Ubuntu    │  Windows   │   NAS       │  Docker      │
│  Server    │  10 Dev    │  (OpenMedia │  Host        │
│  (Web)     │  Server    │   Vault)    │  (Services)  │
└────────────┴────────────┴─────────────┴──────────────┘
Why Proxmox over VMware or Hyper-V?
| Feature | Proxmox VE | VMware ESXi | Hyper-V |
|---|---|---|---|
| Cost | Free (open source) | Free tier limited, paid for features | Free with Windows Server |
| Web UI | Yes, excellent | Yes | Basic (Windows Admin Center) |
| Container support | LXC native | No (needs Docker in VM) | No (needs Docker in VM) |
| Backup built-in | Yes (vzdump) | No (needs vCenter) | Basic |
| Community | Huge, active | Declining since Broadcom | Small |
| Learning curve | Medium | High | Medium |
My Homelab Architecture
Here’s what my single Proxmox host runs. Every box below is an isolated VM or container:
┌─────────────────────────────────────────────────────────────────┐
│                    Proxmox VE Host                               │
│              Dell Optiplex 7080 Micro                            │
│         i7-10700, 64GB RAM, 1TB NVMe + 4TB HDD                 │
├─────────────────────────────────────────────────────────────────┤
│                                                                  │
│  ┌─────────────────┐  ┌─────────────────┐  ┌────────────────┐  │
│  │  VM 100          │  │  VM 101          │  │  VM 102        │  │
│  │  Ubuntu 24.04    │  │  Windows 10 Pro  │  │  TrueNAS       │  │
│  │  Web Server      │  │  Dev Server      │  │  Scale         │  │
│  │                  │  │                  │  │                │  │
│  │  • Nginx         │  │  • Visual Studio │  │  • SMB Shares  │  │
│  │  • Docker        │  │  • SQL Server    │  │  • 4TB Pool    │  │
│  │  • Node.js       │  │  • VS Code       │  │  • Snapshots   │  │
│  │  • PostgreSQL    │  │  • .NET SDK      │  │  • Backup      │  │
│  │                  │  │  • IIS           │  │                │  │
│  │  4 CPU / 8GB RAM │  │  4 CPU / 16GB   │  │  2 CPU / 4GB   │  │
│  └─────────────────┘  └─────────────────┘  └────────────────┘  │
│                                                                  │
│  ┌─────────────────┐  ┌─────────────────┐                      │
│  │  LXC 200         │  │  LXC 201         │                      │
│  │  Docker Host     │  │  Cloudflared     │                      │
│  │                  │  │  Tunnel          │                      │
│  │  • Portainer     │  │                  │                      │
│  │  • Uptime Kuma   │  │  • Routes all    │                      │
│  │  • Gitea         │  │    traffic via   │                      │
│  │  • Homepage      │  │    Cloudflare    │                      │
│  │                  │  │                  │                      │
│  │  2 CPU / 4GB RAM │  │  1 CPU / 512MB   │                      │
│  └─────────────────┘  └─────────────────┘                      │
│                                                                  │
└─────────────────────────────────────────────────────────────────┘
         │                                          │
         │ LAN (192.168.1.x)                        │
         ▼                                          ▼
┌─────────────────┐                    ┌─────────────────────┐
│  Router/Firewall │                    │   Cloudflare Edge   │
│  (No open ports) │                    │   (HTTPS, CDN,      │
│                  │                    │    DDoS protection)  │
└─────────────────┘                    └─────────────────────┘
                                                │
                                                ▼
                                        ┌──────────────┐
                                        │   Internet    │
                                        │   Visitors    │
                                        └──────────────┘
Let’s walk through each piece.
Part 1: Installing Proxmox VE
Download and Flash
- Download the ISO from proxmox.com/downloads
- Flash it to a USB drive using Balena Etcher or Rufus
- Boot from USB, follow the installer
The installer is straightforward — pick your disk, set a password, configure the network. A few tips:
- Use a dedicated small SSD for the Proxmox OS if you can. A 128GB NVMe is perfect. Keep your big storage for VMs.
- Set a static IP during installation. Pick something like
192.168.1.100that won’t conflict with your router’s DHCP range. - Write down the IP and password. You’ll access Proxmox via web browser at
https://YOUR_IP:8006.
Post-Install Essentials
After installation, SSH in and run:
# Remove the enterprise repository (unless you have a subscription)
sed -i 's/^deb/#deb/' /etc/apt/sources.list.d/pve-enterprise.list

# Add the no-subscription repository
echo "deb http://download.proxmox.com/debian/pve bookworm pve-no-subscription"
  > /etc/apt/sources.list.d/pve-no-subscription.list

# Update
apt update && apt full-upgrade -y
Part 2: Ubuntu Server — Your Web Server
This VM hosts websites, APIs, and anything Docker-based.
Creating the VM
In the Proxmox web UI:
- Upload Ubuntu 24.04 Server ISO to local storage
- Click Create VM
- Settings I recommend:
| Setting | Value | Why |
|---|---|---|
| CPU | 4 cores | Enough for Nginx + Docker + Node.js |
| RAM | 8 GB | 4GB minimum, 8GB comfortable |
| Disk | 80 GB (NVMe) | Fast storage for web apps |
| Network | vmbr0 (bridged) | Same network as host |
| Start at boot | Yes | Auto-recover from power outage |
Initial Setup
After installing Ubuntu:
# Update everything
sudo apt update && sudo apt upgrade -y

# Install essentials
sudo apt install -y curl git nginx ufw

# Install Docker
curl -fsSL https://get.docker.com | sh
sudo usermod -aG docker $USER

# Install Node.js (via nvm)
curl -o- https://raw.githubusercontent.com/nvm-sh/nvm/v0.40.1/install.sh | bash
source ~/.bashrc
nvm install 22

# Configure firewall
sudo ufw allow ssh
sudo ufw allow 80
sudo ufw allow 443
sudo ufw enable
Deploying a Website
I use Docker Compose for most web apps. Here’s a typical setup:
# docker-compose.yml
services:
  web:
    image: node:22-alpine
    working_dir: /app
    volumes:
      - ./app:/app
    command: npm start
    ports:
      - "3000:3000"
    restart: always

  nginx:
    image: nginx:alpine
    ports:
      - "80:80"
    volumes:
      - ./nginx.conf:/etc/nginx/conf.d/default.conf
    depends_on:
      - web
    restart: always
Combined with Cloudflare Tunnel (see my previous post), this gives you HTTPS, CDN, and DDoS protection — all without opening a single port on your router.
Part 3: Windows 10 — Development Server
This is the VM I was most skeptical about. Running Windows inside Proxmox? Turns out it works really well — especially for .NET development and testing.
Creating the Windows VM
You’ll need a few things first:
- Windows 10 Pro ISO (download from Microsoft)
- VirtIO drivers ISO — download from fedorapeople.org. This is critical for disk and network performance.
VM settings:
| Setting | Value | Why |
|---|---|---|
| CPU | 4 cores, type: host |
Best performance, expose host CPU features |
| RAM | 16 GB | Windows + Visual Studio + SQL Server needs it |
| Disk | 120 GB (NVMe), bus: VirtIO | Much faster than IDE/SATA emulation |
| Network | VirtIO | 10x faster than default e1000 |
| Display | VirtIO-GPU | Better RDP performance |
| Machine | q35 | Modern chipset, UEFI support |
VirtIO Driver Installation Trick
During Windows install, when it asks “Where do you want to install Windows?” — you’ll see no drives. That’s normal.
- Click Load driver
- Browse to the VirtIO ISO →
vioscsi→w10→amd64 - Now the NVMe disk appears
- After install, mount the VirtIO ISO again and install all remaining drivers (network, balloon, display, etc.)
Optimizing for Remote Access
Since this is a headless server, you’ll access it via RDP (Remote Desktop):
# Enable Remote Desktop (run in PowerShell as Admin)
Set-ItemProperty -Path 'HKLM:SystemCurrentControlSetControlTerminal Server' `
  -Name "fDenyTSConnections" -Value 0

# Allow RDP through firewall
Enable-NetFirewallRule -DisplayGroup "Remote Desktop"
Then install your dev tools:
- Visual Studio 2022
- .NET 8 SDK
- SQL Server Developer Edition (free)
- VS Code
- Git for Windows
Performance tip: Disable Windows animations, transparency, and unnecessary startup programs. This isn’t a desktop — it’s a dev server. Every MB of RAM saved is RAM available for compilation.
# Disable unnecessary visual effects
Set-ItemProperty -Path "HKCU:SoftwareMicrosoftWindowsCurrentVersionExplorerVisualEffects" `
  -Name "VisualFXSetting" -Value 2

# Disable Windows Search indexing (saves CPU)
Stop-Service WSearch
Set-Service WSearch -StartupType Disabled
Part 4: NAS — Network Attached Storage
For the NAS, I run TrueNAS Scale as a VM. You could also use OpenMediaVault — it’s lighter but less feature-rich.
Hardware Passthrough
The key to good NAS performance is disk passthrough — giving TrueNAS direct access to the physical drives instead of using virtual disks.
# Find your disk IDs
ls -la /dev/disk/by-id/ | grep -v part

# Pass physical disks to the VM in Proxmox
qm set 102 -scsi1 /dev/disk/by-id/ata-WDC_WD40EFAX-68JH4N1_SERIAL
qm set 102 -scsi2 /dev/disk/by-id/ata-WDC_WD40EFAX-68JH4N1_SERIAL2
TrueNAS Configuration
After installing TrueNAS Scale:
- Create a Pool — If you have 2+ drives, use a mirror (RAID1) for redundancy
- Create Datasets — Separate datasets for documents, media, backups
- Enable SMB Shares — Access from Windows, Mac, Linux on your network
- Enable Snapshots — Automatic hourly/daily snapshots protect against accidental deletion
TrueNAS Pool Layout:
┌──────────────────────────────┐
│  Pool: homelab-storage        │
│  Type: Mirror (2 × 4TB)      │
│  Usable: ~3.6TB              │
├──────────────────────────────┤
│  ├── documents/    (SMB)     │
│  ├── media/        (SMB)     │
│  ├── backups/      (local)   │
│  └── vm-images/    (NFS)     │
└──────────────────────────────┘
Self-Hosted vs. VPS: An Honest Comparison
I’ve used both extensively. Here’s the real comparison — not the marketing version.
Cost Comparison (Monthly)
| What You Need | Self-Hosted | VPS (e.g., Hetzner) | Cloud (AWS/Azure) |
|---|---|---|---|
| Web server (2 CPU, 4GB) | ~$5 electricity | $5-10/mo | $30-50/mo |
| Dev server (4 CPU, 16GB) | included | $20-40/mo | $80-150/mo |
| NAS (4TB storage) | included | $20-40/mo extra | $90+/mo (S3) |
| Total monthly | ~$10-15 electricity | $45-90/mo | $200-350/mo |
| Upfront hardware | $300-800 one-time | $0 | $0 |
Break-even point: Usually 6-12 months. After that, self-hosting is significantly cheaper.
When to Self-Host
- You want full control over your data
- You need lots of storage (NAS) cheaply
- You want to learn infrastructure skills
- Your services are mostly for personal/family use
- You already have hardware sitting around
- You live in an area with stable power and internet
When to Use a VPS
- You need guaranteed uptime (99.9%+)
- Your visitors are global and latency matters
- You don’t want to deal with hardware failures
- You need to scale quickly
- You’re running a business that depends on it
- Your home internet has data caps or is unreliable
The Hybrid Approach (What I Actually Do)
I use both. Here’s my split:
| Service | Where | Why |
|---|---|---|
| Portfolio/blog | Cloudflare Pages | Global CDN, zero maintenance |
| Dev environment | Proxmox (home) | Needs lots of RAM, no latency concern |
| NAS/storage | Proxmox (home) | Too expensive in the cloud |
| Side project APIs | Proxmox + Cloudflare Tunnel | Free hosting, acceptable latency |
| Production client work | VPS (Hetzner) | Needs uptime guarantee |
| CI/CD runners | Proxmox (home) | Free compute for builds |
Security Hardening — The Non-Negotiable Checklist
Self-hosting means you are the sysadmin. Here’s what you need to do, especially if you’re exposing anything to the internet.
Network Security
┌─────────────────────────────────────────────────────────┐
│                    INTERNET                               │
├─────────────────────────────────────────────────────────┤
│                                                          │
│  ┌──────────────┐     ┌──────────────────────────────┐  │
│  │  Cloudflare   │────▶│  Cloudflare Tunnel           │  │
│  │  (DDoS shield)│     │  (outbound only, no open     │  │
│  └──────────────┘     │   ports on your router)       │  │
│                        └──────────────────────────────┘  │
│                                   │                      │
│  ┌────────────────────────────────▼───────────────────┐  │
│  │              Router / Firewall                      │  │
│  │          NO port forwarding rules                   │  │
│  │          DHCP for regular devices                   │  │
│  │          Static IPs for servers                     │  │
│  └────────────────────────────────────────────────────┘  │
│                          │                               │
│  ┌────────────────────────▼───────────────────────────┐  │
│  │              Proxmox VLAN / Bridge                  │  │
│  │  ┌──────┐  ┌──────┐  ┌──────┐  ┌──────────────┐  │  │
│  │  │Ubuntu│  │Win10 │  │ NAS  │  │Docker + Tunnel│  │  │
│  │  │(UFW) │  │(FW)  │  │(FW)  │  │(iptables)    │  │  │
│  │  └──────┘  └──────┘  └──────┘  └──────────────┘  │  │
│  └────────────────────────────────────────────────────┘  │
│                                                          │
│  Every VM has its own firewall. Defense in depth.        │
└─────────────────────────────────────────────────────────┘
Rule #1: Never expose Proxmox’s web UI (port 8006) to the internet. Access it only from your local network, or through a VPN like WireGuard/Tailscale.
Security Checklist for Non-IT People
If you’re not a sysadmin by trade, here’s the minimum you should do:
1. Use Cloudflare Tunnel Instead of Port Forwarding
This is the single biggest security win. Zero open ports = zero attack surface from the internet.
# Install cloudflared on a dedicated LXC container
docker run -d --restart always --name cloudflared
  cloudflare/cloudflared tunnel run --token YOUR_TOKEN
2. Enable Firewall on Every VM
# Ubuntu
sudo ufw enable
sudo ufw default deny incoming
sudo ufw allow ssh

# Proxmox built-in firewall
# Enable in Datacenter → Firewall → Options → Enable: Yes
3. SSH Key Authentication Only
# On your local machine, generate a key
ssh-keygen -t ed25519

# Copy it to your server
ssh-copy-id [email protected]

# Then disable password login
sudo sed -i 's/#PasswordAuthentication yes/PasswordAuthentication no/' /etc/ssh/sshd_config
sudo systemctl restart sshd
4. Automatic Security Updates
# Ubuntu - enable unattended upgrades
sudo apt install unattended-upgrades
sudo dpkg-reconfigure -plow unattended-upgrades
5. Backup. Backup. Backup.
Proxmox has built-in backup. Set it up:
- Go to Datacenter → Backup
- Add a backup job
- Schedule: Daily at 2 AM
- Storage: your NAS or an external drive
- Retention: keep last 7 daily, 4 weekly
# Verify backups actually work by restoring a test VM
qmrestore /mnt/backup/vzdump-qemu-100-2026_02_15.vma 999
Common Security Mistakes
| Mistake | Risk | Fix |
|---|---|---|
| Port forwarding 8006 | Full Proxmox control to attackers | Use Tailscale or local access only |
| Using root for everything | One compromised service = game over | Create non-root users per VM |
| No backups | Ransomware, disk failure = total loss | Proxmox backup + off-site copy |
| Default passwords | Brute force attacks | Strong passwords + SSH keys |
| Ignoring updates | Known vulnerabilities exploited | Enable auto-updates |
| Single disk, no redundancy | One failure = all data lost | Mirror/RAID for important data |
Hardware Recommendations
For Beginners (Budget Build)
If you’re just starting, you don’t need fancy hardware. An old office PC works great.
| Component | Recommendation | Budget |
|---|---|---|
| PC | Dell Optiplex, HP ProDesk, Lenovo ThinkCentre (used) | $100-200 |
| CPU | Intel i5-8th gen or newer (4+ cores) | included |
| RAM | 32 GB DDR4 (upgrade from stock) | $40-60 |
| Boot drive | 256 GB NVMe SSD | $25-35 |
| Storage | 2 × 4TB HDD (for NAS mirror) | $100-150 |
| Total | $265-445 |
Why used office PCs? They’re enterprise-grade, dirt cheap on eBay, quiet, and power-efficient (35-65W TDP).
For Power Users
| Component | Recommendation | Budget |
|---|---|---|
| PC | Dell Optiplex 7080/7090, custom mini-ITX | $200-400 |
| CPU | Intel i7-10th gen+ or Ryzen 7 (8+ cores) | included |
| RAM | 64 GB DDR4 | $80-120 |
| Boot drive | 512 GB NVMe | $40-50 |
| VM storage | 1 TB NVMe | $60-80 |
| NAS storage | 2 × 8TB HDD | $200-300 |
| UPS | APC Back-UPS 600VA | $60-80 |
| Total | $640-1030 |
Key Hardware Considerations
RAM is king. Each VM needs dedicated RAM. Here’s my allocation:
Total: 64 GB
├── Proxmox host:    4 GB
├── Ubuntu web:      8 GB
├── Windows 10 dev: 16 GB
├── TrueNAS:         4 GB  (+ ARC cache uses remaining free RAM)
├── Docker LXC:      4 GB
├── Cloudflared:   512 MB
└── Reserve:        ~27 GB  (for spikes, additional VMs)
Power consumption matters. My Optiplex idles at ~35W. That’s about $3-5/month in electricity. A full tower server might idle at 150W+ ($15-20/month).
UPS (Uninterruptible Power Supply) is essential. A $60 UPS protects against:
- Sudden power loss (corrupted VMs, damaged ZFS pools)
- Power fluctuations (hardware damage)
- Gives you 15-30 minutes to safely shut down
Noise. If the server is in your living space, noise matters. Mini PCs and small form factor desktops are much quieter than rack servers. My Optiplex is essentially silent.
Getting Started: Step-by-Step Summary
If you’ve read this far and want to try it:
- Get hardware — A used Dell Optiplex with 32GB RAM is the sweet spot for starting
- Install Proxmox — Flash the ISO, run the installer, access web UI at port 8006
- Create Ubuntu VM — Your web server for websites and Docker services
- Create NAS VM — TrueNAS or OpenMediaVault for storage
- Set up Cloudflare Tunnel — Expose services securely without port forwarding
- Add Windows VM — Only if you need it for .NET or Windows-specific dev work
- Configure backups — Before you put anything important on it
- Harden security — Firewall, SSH keys, updates
Don’t try to do everything at once. Start with Proxmox + one Ubuntu VM. Get comfortable. Then add more services over time.
What I Wish I Knew Before Starting
It takes more time than you think. The initial setup is a weekend project. Getting everything dialed in takes weeks of tweaking. But the learning is the point — I understand networking, storage, and Linux administration better now than after years of using managed services.
Hardware failures happen. My first setup was on a 10-year-old PC with no backup. The hard drive died 3 months in. I lost everything. Now I have mirror drives and automated backups to an external disk plus cloud. Learn from my mistake.
Self-hosting is not set-and-forget. You’ll need to update Proxmox, update VMs, check backups, monitor disk health. Budget 1-2 hours per month for maintenance. It’s not a lot, but it’s not zero.
Start with Cloudflare Tunnel from day one. Don’t even think about port forwarding. Tunnel gives you secure external access with zero configuration on your router. I wrote a dedicated guide about Cloudflare Tunnel if you want the details.
The best part of self-hosting? Complete control. No vendor lock-in, no surprise bills, no terms of service changes. Your data, your rules, your server running in your home. For a tech professional who wants to learn infrastructure — or just save money — it’s genuinely hard to beat.
October 2026 operations update: distinguish guest recovery from application recovery
The setup above places multiple useful services on one Proxmox host. The next design decision is which failures each backup is supposed to cover. A guest backup and an application backup protect different things, and neither should be described as a complete disaster-recovery plan without a tested restore.
Keep a recovery inventory per workload
Record the guest type, persistent volumes, application database, uploaded files, source release and network route. Store secrets separately from the public version of that inventory. Use an unprivileged container when it fits the workload and test the privileges it actually needs; choose a VM when the workload’s isolation or compatibility requirements call for one. The right choice depends on the service, not on fitting the maximum number of services onto the host.
The portfolio’s WordPress workload uses a dedicated unprivileged guest and a separate application backup process. This is a description of the current arrangement, not a recommendation to copy its resource sizing for an unrelated workload.
Choose consistency before choosing a backup mode
Proxmox documents guest backup modes and their trade-offs in its official backup documentation. Choose the mode according to the guest, storage and acceptable interruption. For a database-backed application, decide how the database and persistent files will be captured consistently; do not treat a live guest snapshot as a substitute for checking application recovery.
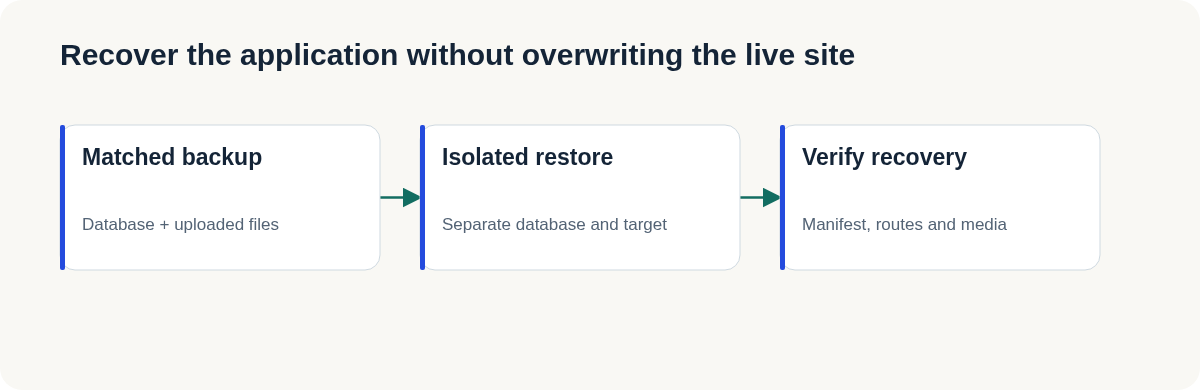
WordPress needs a database export as well as its files. Its database backup guide explains that a database dump still has to be imported during recovery. In this portfolio, the application backup is a matched set of database data, uploads and a verification manifest, with the deployed source identified separately.
Restore somewhere that cannot overwrite the live service
The application restore script accepts only a separate target directory, a separate database name and a localhost-only URL. It rejects the live site’s targets. The restored manifest is compared with the backup before route and media checks are run.
The October 5 application recovery test matched 1,223 content records and 3,365 media files, checked localized pages and media, and removed the test instance afterward. Full Proxmox host recovery, replacement hardware and an independent offsite restore were not tested in that exercise. Keep those as explicit recovery scenarios in the runbook.
A practical test matrix includes application corruption, a broken source deploy, guest loss, host loss and unavailable backup storage. Define the required recovery point and time for each scenario, then measure them during a drill. No measured recovery-time or recovery-point objective is claimed here.
Account for the shared box
A guest boundary does not remove contention for memory, storage or network capacity. Record storage growth, backup duration and peak resource usage before adding another public service. A workload that must remain available during host maintenance may need a separate host or a different hosting arrangement.
For the application-level checks and cache measurements, continue with the mini PC operations update. For exposing public applications while protecting privileged paths, see the Cloudflare Tunnel guide.
Related reading
07 Oct 2026 · 8 min read
agentic-ai
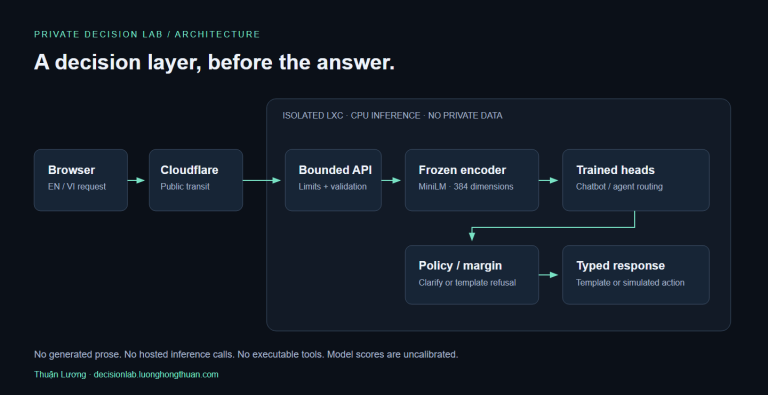
Building a Private Decision Layer for Chatbots on a CPU Homelab
A CPU-only chatbot and agent routing demo: trained classifier heads, bilingual tests, measured LXC latency, failure cases and a live homelab deployment.
Read more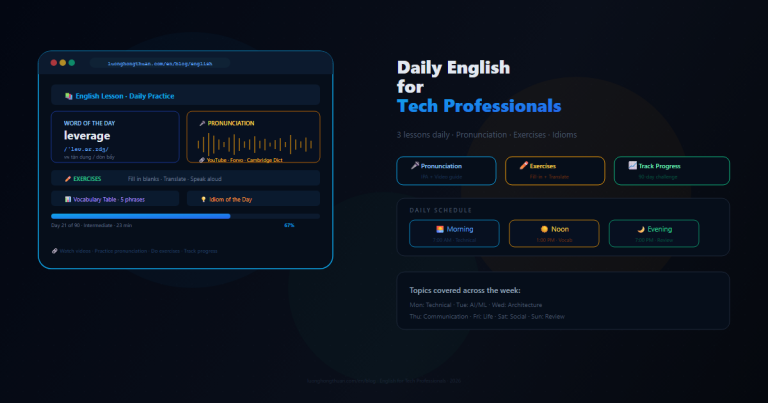
05 Oct 2026 · 4 min read
english-lesson
English Lesson — Monday Morning: Networking & API Reliability Vocabulary
Daily English practice for tech professionals. Morning session covering timeout, retry, and API reliability vocabulary with pronunciation guide, exercises, and real-world examples.
Read more
27 Sep 2026 · 4 min read
agents
Your Agent's Sandbox Has a DNS-Shaped Hole
OpenAI's own incident report shows an RL agent smuggling questions out through DNS lookups after HTTPS egress was blocked. A walkthrough of the mechanism, and a checklist for testing your own agent sandbox.
Read more
Discussion
Comments are reviewed before publication. Your email is kept private.