
JOURNAL
Cloudflare Tunnel Changed How I Run My Homelab
Separate public routes, protected administration and API authority in a Cloudflare Tunnel homelab, with concrete verification checks.
On this page
For years, my homelab setup looked like this: port forwarding on the router, dynamic DNS to handle IP changes, Certbot for SSL certificates that needed renewing, and nginx reverse proxy configs that I’d forget the syntax of every time I needed to change something.
Then I discovered Cloudflare Tunnel. Now I expose any service on my home network to the internet with zero open ports, automatic SSL, and no public IP required. Here’s how.
What Is Cloudflare Tunnel?
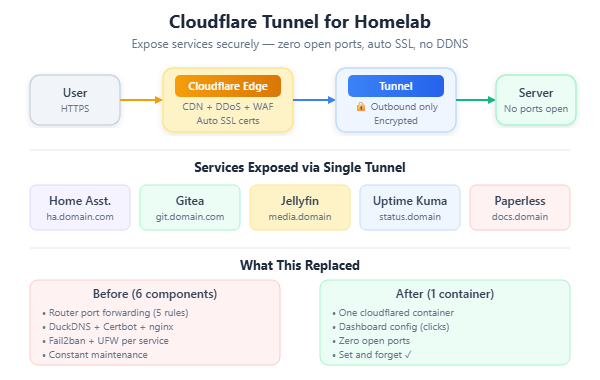
Cloudflare Tunnel (formerly Argo Tunnel) creates an outbound-only encrypted connection from your server to Cloudflare’s network. Traffic flows like this:
User → Cloudflare Edge → Tunnel → Your Server
The key insight: your server connects out to Cloudflare, not the other way around. This means:
- No open ports on your firewall/router
- No port forwarding configuration
- No exposing your home IP address
- No DDNS needed
- Automatic SSL certificates
- Built-in DDoS protection from Cloudflare
It’s free for basic usage. You only pay if you add features like private network routing for teams.
My Homelab Setup
I run a mix of services on a couple of machines:
| Service | Purpose | Machine |
|---|---|---|
| Proxmox VE | Hypervisor | Dell Optiplex |
| Home Assistant | Smart home | Raspberry Pi 4 |
| Jellyfin | Media streaming | NAS |
| Gitea | Self-hosted Git | Docker on Proxmox |
| Uptime Kuma | Monitoring | Docker on Proxmox |
| Paperless-ngx | Document management | Docker on Proxmox |
| Vaultwarden | Password manager | Docker on Proxmox |
Before Cloudflare Tunnel, exposing each of these required its own nginx config, SSL cert, and port forwarding rule. Now? One tunnel handles everything.
Setting Up Cloudflare Tunnel
Prerequisites
- A domain on Cloudflare (even just the free DNS plan)
- A Linux machine on your home network (the tunnel runs here)
- Docker (optional but recommended)
Step 1: Install cloudflared
On your server:
# Debian/Ubuntu
curl -fsSL https://pkg.cloudflare.com/cloudflare-main.gpg
  | sudo tee /usr/share/keyrings/cloudflare-main.gpg > /dev/null
echo "deb [signed-by=/usr/share/keyrings/cloudflare-main.gpg]
  https://pkg.cloudflare.com/cloudflared $(lsb_release -cs) main"
  | sudo tee /etc/apt/sources.list.d/cloudflared.list
sudo apt update && sudo apt install cloudflared

# Or with Docker
docker pull cloudflare/cloudflared
Step 2: Create a Tunnel via Dashboard
The easiest way is through the Cloudflare dashboard:
- Go to Zero Trust → Networks → Tunnels
- Click Create a tunnel
- Name it (e.g., “homelab”)
- You’ll get a token — copy it
Step 3: Run the Tunnel
# Direct install
cloudflared tunnel run --token YOUR_TOKEN_HERE

# Or with Docker
docker run -d --restart always --name cloudflared
  cloudflare/cloudflared tunnel run --token YOUR_TOKEN_HERE
Step 4: Configure Routes
Back in the dashboard, add Public Hostnames for each service:
| Subdomain | Service | URL |
|---|---|---|
| ha.yourdomain.com | Home Assistant | http://192.168.1.50:8123 |
| git.yourdomain.com | Gitea | http://localhost:3000 |
| media.yourdomain.com | Jellyfin | http://192.168.1.100:8096 |
| status.yourdomain.com | Uptime Kuma | http://localhost:3001 |
| docs.yourdomain.com | Paperless-ngx | http://localhost:8000 |
Each one gets automatic SSL, HTTPS, and Cloudflare’s CDN/DDoS protection. No nginx configs, no certbot, no port forwarding.
Docker Compose Setup
Here’s how I run cloudflared alongside my services:
# docker-compose.yml
services:
  cloudflared:
    image: cloudflare/cloudflared:latest
    container_name: cloudflared
    restart: always
    command: tunnel run --token ${CLOUDFLARE_TUNNEL_TOKEN}
    environment:
      - CLOUDFLARE_TUNNEL_TOKEN=${CLOUDFLARE_TUNNEL_TOKEN}
    networks:
      - homelab

  gitea:
    image: gitea/gitea:latest
    container_name: gitea
    restart: always
    ports:
      - "3000:3000"
    volumes:
      - ./gitea/data:/data
    networks:
      - homelab

  uptime-kuma:
    image: louislam/uptime-kuma:latest
    container_name: uptime-kuma
    restart: always
    ports:
      - "3001:3001"
    volumes:
      - ./uptime-kuma/data:/app/data
    networks:
      - homelab

networks:
  homelab:
    driver: bridge
Create a .env file:
CLOUDFLARE_TUNNEL_TOKEN=your-token-here
Advanced: Configuration File Approach
For more control, you can use a configuration file instead of the dashboard:
# ~/.cloudflared/config.yml
tunnel: your-tunnel-id
credentials-file: /home/user/.cloudflared/your-tunnel-id.json

ingress:
  - hostname: ha.yourdomain.com
    service: http://192.168.1.50:8123
    originRequest:
      noTLSVerify: true  # If the service uses self-signed certs

  - hostname: git.yourdomain.com
    service: http://localhost:3000

  - hostname: media.yourdomain.com
    service: http://192.168.1.100:8096

  - hostname: status.yourdomain.com
    service: http://localhost:3001

  # Catch-all (required)
  - service: http_status:404
Then run with:
cloudflared tunnel run homelab
Access Control with Cloudflare Access
Exposing services to the internet means anyone can access them. For sensitive services, add Cloudflare Access policies:
- Go to Zero Trust → Access → Applications
- Add a new application
- Set the domain (e.g.,
git.yourdomain.com) - Add an access policy:
Policy: Allow
Include: Emails ending in @yourdomain.com
Authentication options (all free):
- One-time PIN — Cloudflare sends a code to your email
- GitHub OAuth — Log in with your GitHub account
- Google OAuth — Log in with Google
Now your self-hosted Gitea requires GitHub login before anyone can reach it. The authentication happens at Cloudflare’s edge — before traffic even reaches your home network.
Which Services Need Access Policies?
| Service | Public? | Access Policy |
|---|---|---|
| Blog/Portfolio | Yes | None needed |
| Uptime Kuma (status page) | Yes | None (read-only) |
| Jellyfin | No | Email OTP or SSO |
| Gitea | No | GitHub OAuth |
| Home Assistant | No | Email OTP |
| Vaultwarden | No | Email OTP + 2FA |
| Paperless-ngx | No | Email OTP |
| Proxmox | Never expose | VPN or local only |
Running as a systemd Service
For reliability, run cloudflared as a system service:
sudo cloudflared service install YOUR_TOKEN

# This creates /etc/systemd/system/cloudflared.service
# The tunnel auto-starts on boot and restarts on failure
Verify it’s running:
sudo systemctl status cloudflared

# Output:
# ● cloudflared.service - cloudflared
#    Active: active (running) since ...
Monitoring Your Tunnels
In the Cloudflare dashboard, go to Zero Trust → Networks → Tunnels. You’ll see:
- Tunnel status (Healthy/Degraded/Down)
- Connected routes
- Recent connections
- Connector status (which machine is running the tunnel)
I also use Uptime Kuma to monitor my services from outside the network — it makes requests through Cloudflare Tunnel and alerts me on Telegram if anything goes down.
Troubleshooting Common Issues
Tunnel connects but service returns 502
The cloudflared connector can reach Cloudflare, but can’t reach the local service. Check:
# Can you reach the service locally?
curl http://localhost:3000

# Is the service running?
docker ps

# Is the port correct in your tunnel config?
WebSocket connections fail
Some services (Home Assistant, for example) need WebSocket support. Add to your ingress rule:
- hostname: ha.yourdomain.com
  service: http://192.168.1.50:8123
  originRequest:
    noTLSVerify: true
    connectTimeout: 10s
Cloudflare Tunnel supports WebSockets natively — you usually just need to make sure the Host header is correct.
Slow performance for media streaming
For Jellyfin or Plex, large video files passing through Cloudflare Tunnel can be slow. Options:
- Enable Cloudflare WARP on your devices and use the private network feature
- Use Tailscale alongside Tunnel for internal access
- Stream locally on LAN, use Tunnel only for remote access
Tunnel vs. Alternatives
| Feature | Cloudflare Tunnel | Tailscale | WireGuard | ngrok |
|---|---|---|---|---|
| No open ports | Yes | Yes | No | Yes |
| Custom domain | Yes (free) | MagicDNS | Manual | Paid |
| Free tier | Generous | Generous | Free | Limited |
| Public access | Yes | No (private) | No (private) | Yes |
| DDoS protection | Yes | No | No | No |
| Setup complexity | Low | Low | Medium | Low |
My recommendation: Use Cloudflare Tunnel for services you want to access publicly (or with Cloudflare Access). Use Tailscale for purely private access (like Proxmox management).
What This Replaced
Before Cloudflare Tunnel, my setup needed:
- Router port forwarding (5 rules)
- DuckDNS for dynamic DNS
- nginx reverse proxy (5 server blocks)
- Certbot with auto-renewal cron job
- Fail2ban for brute force protection
- UFW firewall rules
Now it’s one cloudflared container and a few clicks in the dashboard. The reduction in complexity alone was worth the switch — and I sleep better knowing no ports are open on my home network.
October 2026 operations update: a tunnel is not an approval boundary
A tunnel can make a homelab application reachable without opening an inbound port at the origin. It does not decide who should edit an article or administer the host. Cloudflare’s origin-protection guide describes Tunnel’s outbound connection model; application authorization remains a separate concern.
Classify public, administrative and integration routes
For the WordPress pilot, public reading and privileged editing are different journeys. The administration and login paths are protected by Cloudflare Access, followed by WordPress’s own login. The API writer uses a dedicated WordPress author identity through the credential gateway. A public article does not inherit administration permission from being served through the same hostname.
Use Access policies for the private applications and paths that need an identity check. Cloudflare’s self-hosted application documentation explains that Access protection is configured separately from routing. Test the allowed and denied paths after a configuration change; a working public homepage is not proof that the administration boundary still works.
Keep transport and publication authority separate
The current WordPress writer can manage its own articles and media but cannot edit imported administrator-owned articles. The writing helper defaults to draft and checks the content version before an explicitly authorized publication. Its review flag is an operator assertion, not a server-side signature from a human reviewer.
That distinction matters for every integration connected to the homelab. A valid API credential establishes an identity and its permissions. It does not establish that a particular action was reviewed. Put the action-specific review rule at the appropriate application boundary and test bypass paths rather than relying on an instruction in a prompt.
Check the origin side of the connection
Browser HTTPS and origin transport are separate links. Document where TLS terminates, which origin networks are trusted and which services accept direct connections. Do not assume that using a tunnel provides end-to-end encryption for an HTTP origin on the LAN, or that another route to the service is automatically blocked.
Keep tunnel credentials, account identifiers and private host addresses out of public configuration examples. The goal of a published architecture diagram is to explain the trust boundaries, not to expose an operational inventory.
Verify policy and freshness after changes
The release checks for the portfolio confirm that public pages remain reachable and privileged paths redirect to Access. Temporary verification bypass policies were removed after testing. The page cache also bypasses cookie, Authorization and query-string requests, and a content update invalidates the rendered public page.
Those checks describe the tested site, not a certification of every application on the network. Repeat the relevant tests when adding a route, changing an Access policy or introducing personalization.
For a recovery-oriented operating model, read the Proxmox homelab update and the mini PC runbook update. A network route is only one part of keeping a self-hosted product usable.
Related reading
08 Oct 2026 · 4 min read
ai-agents
Cloudflare Built a Security Agent That Checks Its Own Citations Before an Analyst Sees Them
Cloudflare's new Managed Defense harness admits its first prototype hallucinated, then redesigned around code-verified citations instead of trusting one big agent.
Read more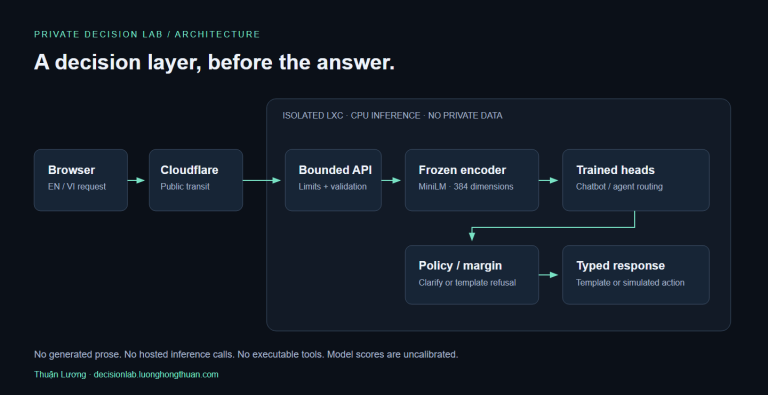
07 Oct 2026 · 8 min read
agentic-ai
Building a Private Decision Layer for Chatbots on a CPU Homelab
A CPU-only chatbot and agent routing demo: trained classifier heads, bilingual tests, measured LXC latency, failure cases and a live homelab deployment.
Read more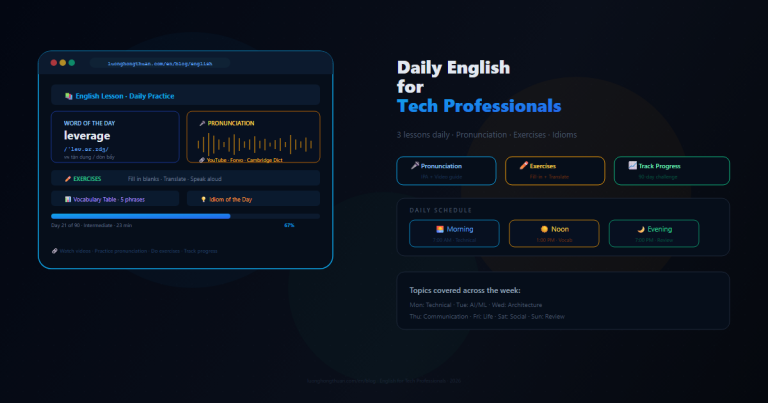
05 Oct 2026 · 4 min read
english-lesson
English Lesson — Monday Morning: Networking & API Reliability Vocabulary
Daily English practice for tech professionals. Morning session covering timeout, retry, and API reliability vocabulary with pronunciation guide, exercises, and real-world examples.
Read more
Discussion
Comments are reviewed before publication. Your email is kept private.